![]()
|
|
|
Architect & Engineering Specifications Plant Disease & Insect Control
|
If you haven't visited the page - Landscaping Styles < click this link to view and return with your back button. Getting the desire is the first part of landscaping. A bad experience with a landscape is discouraging. Spending money, and trying to do a landscape only to watch it fail may prevent you from doing it again. The point is, if it is done right the first time, you will never have to do it again. You might have a look at our detailed specification on landscaping. Having the soil properly prepared for the type of plants you intend to use is the first step. Identify a style or Motif that you are trying to emulate. Pay attention to the exposure. This is the area that a plant is to grow in. i.e. full sun, part sun, full shade. morning sun only, north-south-east-west wall exposure. The wrong exposure for a particular type of plant can be instant failure. Plan your irrigation scheme. Manual watering can be a laborious task that you may begin with good intentions, but give up on as time progresses. A wonderful landscape can make a difference in how much you appreciate a property. It can draw you in, and attract business as well. It can change the value of a property and close a sale. So here we go... Have these items in mind as you begin.
We are going to turn you into a Landscape Artist right now. We will start with some Do's and Don'ts Don't... Don't mix Formal with casual. This is straight lines with curved lines, or uniform structure with relaxed variations. Imagine flowing freeform beds, and then a straight hedge along the sidewalk. It is like wearing plaid and stripes together. Don't mix Mountain-scape with Tropical as with Pines and Palms or Junipers with Hibiscus. Don't be afraid to emulate other landscapes you have seen. If you like it, do it. Don't ask anyone's opinion of your design, you will get a thousand different opinions, and they are just opinions. Please yourself. Do... Do Look at the 20 year growth habit of the plants of choice, and plan for a long term landscape. Do ask people of their experience with the particular type of plants you intend to use. Do look for plants that only require annual pruning. (Low maintenance) Do look at other designs for ideas. Do follow the recommended spacing for planting. Don't try to stretch or it won't fill properly.
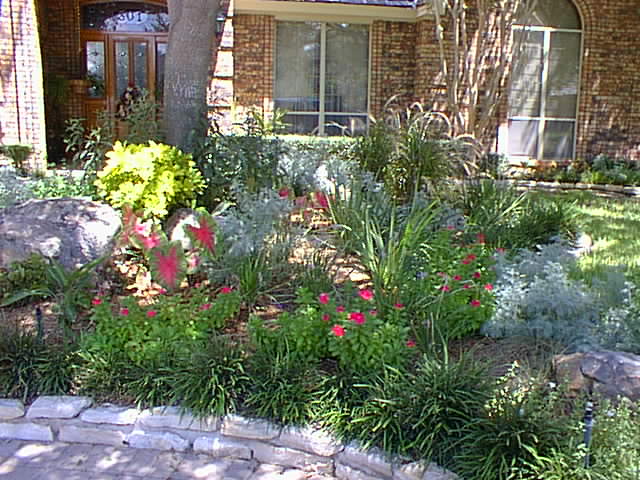
Now for the artistic part. Be flamboyant. Like a painter with confidence, approach the canvas with a large brush, and swash the background. Use large sweeping swashes for effect. Use height variations. Use splashes of color. Be thoughtful about your color choices. Some mixes of colors can be shocking as with orange and blue. Use your favorite colors. The background, which is the house wall, can sometimes clash with the colors chosen. If you have a poor color sense ask others. If possible use a varying grade with hills and valleys to break up the mundane. Use hardscape, rocks, boulders, walls, walks, statuary, and pottery. Click to enlarge these images to see the conceptual differences. The first is a simple ring planting and the second is an offset kidney shape with plants that vary in height.
The simple ring around the tree can be expanded to a free form bed with broad fields of various plants. In the example the African Iris is chosen for height in the rear with Caladium's and Liriope as the sweep comes forward with Crotons peaking up near the front and a wash of Asiatic Jasmine down in the very front. The next example is an elaborate entry on a large home. It is balanced, but feels to be freeform with all the curves, it is elegant yet relaxed. The Viburnum shrub vaults at the corners and the reliable Dwarf Katie (hybrid wild petunia) is used as a continuous splash of perennial color. The bulk of the ground cover is the low maintenance Asiatic Jasmine with Giant Liriope as an occasional variation. Dwarf Yaupon is the key shrub along the walls and curved separations. It was chosen for it's slow growth rate. The King Sago is the key feature at the extreme corners. This landscape will require no pruning for the first two years, and only an annual snip thereafter. This is easily a fifteen to twenty year landscape. The only item that may need replacing is the Viburnum at about year ten. However, if it is cut back properly it can go twenty years.
In this next example we have a garden home. The outer corners are accented with Large Queen palms. Crepe Myrtle's are next in the inward direction with the one on the left partially hiding a window. Yaupon is the hedge against the wall and below the bay. Purple fountain grass is a colorful accent behind the Queen palms. At the front of the walk are two Pygmy Date palms. Below the palms is a splash of color using Purslane and Periwinkles. Up the walk is Dwarf Katie. The main ground cover is Asiatic Jasmine, and the occasional plant is African Iris with Dwarf Bird of Paradise. The performance of this landscape will be superior. The purslane and periwinkle are considered seasonal color to be changed in the fall to say petunias and snapdragons.
Here in this final example we have a private walking path created around a hill and valley effect. The walkway meanders in and around Green Sage, Pampas grass, Bougainvillea and Carissa, with washes of Lantana and Wedellia cascading over the slopes. The walkway is Bermuda grass that has been edge out with commercial plastic edging.
Now with some good ideas in hand, sit down at the drawing table with some large paper, 24 x 36 at least. Draw the base map of the walls and walks and any other hard structures, then get creative. Use a scale of 1 inch equals 8 feet or if your paper is large enough use 1 inch equals 4 feet. The larger the better. Look through our virtual nursery. and choose some plants. Pay attention to the height and width specifications. Pay attention to the exposure requirements. Make little symbols to represent your plants. You can buy architectural templates that help you draw the symbols. The symbol must match the scale you are drawing in. i.e. if the width specification of a plant is 2 ft. and your scale is 1 to 8 then the symbol should be 1/4 inch in diameter, if the plant spec. is 4 ft. then the symbol should be 1/2 inch in diameter. Plant Spacing Generally the spacing of the natural habit of the plant is the proper spacing. Sometimes to fill a hedge we will shorten the distance to get a quick fill. i.e. Dwarf Yaupon on 1.5 foot centers in stead of 2. Sometimes we want a crowded or overstuffed look, or to avoid weed infestation we will tighten a spacing on a ground cover. Of course, when you tighten the spacing the number of plants for an area goes up, and so does the cost. Most groundcovers, as with Asiatic Jasmine, are done on one foot centers. Attempting to stretch the spacing always causes problems. i.e. slow fill and weed infestation. Exposure Placing plants in the proper location is very important. Follow the nursery tag information. If an item is listed as full sun, it may work in part sun or even shade. It will grow slower and may form a different habit. However, plants listed as full shade will die if they are placed in full sun. Don't experiment. Take the advice of the nurseryman. When you are planning an area consider, that in the beginning the area is full sun, but as the trees grow, in 5 years the area will be shaded. This may be an area that will change as time goes on, requiring a different plant after the transition. Soil Preparation Depending on the type of soil you are dealing with, you will need to add some amendments to improve the fiber & bacteria available to the plant roots. Combination soil conditioners are the best. These are usually made up of composted pine bark, peat moss, manure & ash. Simple compost is also available and is usually made of corn silage and manure. Apply an even one inch of the material on the surface of the ground and till it in to six inches. This can be done by hand, but is best done by machine. Tilling in deeper, say to twelve inches can be difficult and requires at least another inch of compost. We usually only till deep in the areas where larger specimens will be planted. If a large accent like a Crepe Myrtle is to be set to 18 or 24 inches, we will loosen the soil to 30 inches and blend in the compost. Most areas around the valley have soil that is clay and sand. Some areas have a topsoil that is darker and richer. Some areas have rocky clay soil. Experience has shown that when using the plants recommended by the nursery, and adding the compost as described above, you will have a successful landscape. Always top dress the planting bed. Use a virgin mulch (this means weed and seed free and uncontaminated) . This can be Pine or Cypress and it comes in many grades, small particle, medium particle and large particle. Make the mulch at least 2" deep. This will shade protect the soil, keeping it cool and moist. This is essential for the bacteria that live in the soil. The bacteria live and die, and upon decomposition release nitrogen. This continual symbiosis cycle is a self-contained composter. It only works if the mulch is there. If planted properly you will only mulch once. The droppings from the plants then provide a continual addition to the soils surface. Ground covers will take over, and you will never mulch again. Adding Fertilizer Soil conditioners with peat moss can be slow to activate. They can actually rob the nitrogen in the beginning. Compost that is of corn silage and manure are much faster to release nitrogen. Initially it is a good idea to fertilize. Avoid high nitrogen on newly planted beds however, high phosphorus is desirable. For quick results use a liquid root stimulator. These are generally 2% nitrogen, as much as 20% phosphorus. with iron, copper, zinc and rooting hormone (Indole-butyric Acid). Of course, this is not essential, but the results will be superior performance. Follow then in one week with a 5-24-10 fertilizer. To explain those numbers the first number is nitrogen the second is phosphorus and the third is potassium. Now, you don't have to have the exact numbers specified, just get as close as you can. It all depends on what is in stock. High nitrogen produces a quick flaccid growth, and is generally not good. High nitrogen is usually used professionally to recover high traffic lawns on golf courses and play fields. Low nitrogen and high phosphorus produce a strong healthy growth with good flowering and fruiting habit. Not much mention about potassium. That is because a soil test will show that it is readily available in the valley soils, but what is called exchangeable potassium is used up quickly by the plants. Not to worry, it is provided in all fertilizers. Apply the fertilizer moderately. Seven to ten pounds per thousand square feet. If it is in summer repeat the application every six weeks from May to September. In the Fall, fertilize only once in October and nothing till April. If it is a new installation in the winter, apply at least half the amount or 5 pounds per 1000 square feet. This is because a new bed will need a boost even in winter. Watering Not knowing what your particular ground moisture situation is, we must assume that it is dry. New installations generally are, unless we are in a rainy period. Newly installed plants from the nursery need quite a bit of water. This is because they are coming from a nursed situation where they are watered two to three times a day, and fed once a week. The Evaporation from the leaf surface will be high. In the beginning you should water the new bed twice a day for the first week. Give it a good soaking. If the ground moisture is already high, and you see puddles that do not drain away, suspend the watering or you may drown the new plants. Almost all plants except for aquatics need moist well drained soil. The water needs to pass over the root system on it's way to the deep soil region. Once the deep soil region has received enough water, it begins to stabilize. You will notice that it takes less water, and that pooling at the surface occurs. You can then begin to cut back on the amount of watering. During the second week you should be able to water once a night, or once in the early morning. The ground moisture should remain during the hot summer day. This is of course only if you have two inches of mulch on the surface of the ground. Continue with the once a day watering through the third week. At the fourth week change to an every other day watering. At this point the plants may wilt a bit. Don't be alarmed. This is weaning. Their roots will begin to go deeper for more water. Continue the every other day watering into the fifth week. At the sixth week cut back the water to every third day. This is called hardening off the landscape installation. If you have a programmable sprinkler system this will be easy. It is excepted science, here in the valley, that when you water you should deep water, or flood. The purpose of this is to wash the salt, that builds up at the surface, deep into the soil and away from the surface. Don't run you sprinkler longer to achieve this. All that will happen is the water will run over into the street, and down the gutter. You must use multiple watering cycles or start times with soak cycles in-between. This gives the ground a chance to absorb the water. i.e. Run the sprinkler section for three - ten minute cycles with at least thirty minutes of soak time in-between. Ten minutes is just an example. It may not be correct for the type of sprinkler device you have. Rotor heads (heads that rotate back and forth) generally require 30 to 60 minutes depending on the nozzle. To break up a 60 minute cycle you would use (3) 20 minute cycles. To get that deep watering you would run that cycle twice on a dual program, only once a week in well shaded landscape or twice a week in a full sun (no canopy) landscape. Conserving water is our way of life! Experience has shown that proper feeding and hardening of the installation makes a superior and more durable landscape. High nitrogen and excessive water produces weak flaccid growth, and a shallow root system. Using the proper fertilizer and the right amount of water makes you landscape durable in times of drought, and tuff for those occasional winter freezes. Deep watering twice a week should be your goal. Tree, shrub and ground covers that provide shade is the key to water economy. Full canopy landscapes can achieve a once a week deep watering and look fabulous.
Courtesy Earth Irrigation & Landscaping Inc. - The Grand Oak Junction Nursery Email - mail@grandoakjunction.com Copyright © Earth Irrigation & Landscaping Inc. 9/17/98
|
|
Copyright© Earth Irrigation & Landscaping Ltd. Site Designed and Maintained by PERi LTD |
 How
to, guide to Landscaping
How
to, guide to Landscaping
)
)
)
)
)