![]()
|
|
|
Architect & Engineering Specifications Plant Disease & Insect Control
|
Print this page and put it in your files. The Rio Grande Valley is a stratified area with many pockets of varying soil types. In one area you may find a sandy soil. In another area just a few yards over you may find clay. This variation runs into gravel, sand, caliche (near rock) and in some cases you will find a friable sandy loam. The climate is semi-tropical and is identified as zone 9 on the botanical map. The general soil pH (acidity) is 7.5 to 7.9 which unfortunately is alkaline. The natural water salinity varies from 300 to 1300 PPM which is high salts. Rainfall is minimal and the area is considered to be semi-arid, but at times can run considerably over the expected rainfall totals. Occasional winter freezes and occasional tropical storms including hurricanes are natural disasters that affect landscaping. The water table, also stratified can be found as shallow as 6 ft. in Brownsville or 90 ft. in McAllen. Water quality of wells can be brackish and unusable to potable. Location and depth of the well are determining factors. Pest infestation runs from moderate during dry times to extreme during wetter periods. Common pests such as Thrips, Aphids, Scale, Mealy bugs, Whitefly, Caterpillar, Spider mite, Cutworms, Root Weevils, Squash Bugs, Earwigs, Cutter Ants, Carpenter Ants. are among the most common. Powdery Mildew, Rust, Leaf Spot. Fire blight, Black Spot, Oak Root Fungus, Texas Root Rot and Verticillium Wilt are some of the diseases to watch for. Ground squirrels, rabbits, & birds are also responsible for landscape damage. With all these problems stacked against a good landscape how will it ever be successful. The First Element - Soil Lets begin with the first element ... the soil. In most cases, regardless of the soil you discover at the Landscape site, a solution can be found. Before designing the landscape the soil type should be investigated. Rather than attempting an expensive modification of the existing soil, the plant choices and a planting scheme can be chosen that the existing soil will accommodate. Native plant types tolerate and often thrive in poor, alkaline, sandy, rocky soil. Some common amendments such as soil conditioner and a top dressing of mulch, add fiber, bacteria and moisture containment. This produces an excellent growing media. The following is a list of soils and the amendments required to bring them in to the Friable Sandy Loam category for optimal growth of most desirable plants.
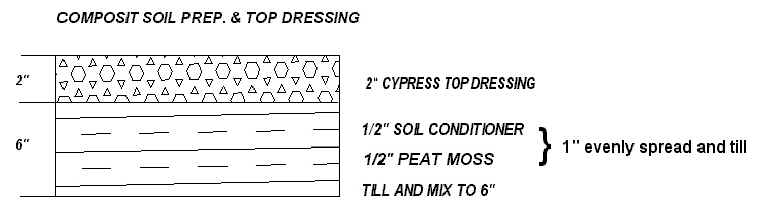
* If the area is used for a planting bed the Soil Conditioner should be a 50/50 blend of Peat moss and compost. * If the area is used as a planting bed, top dress the area with Mulch. Virgin, seed free Pine or Cypress mulch. * Gypsum loosens and breaks clay compaction.
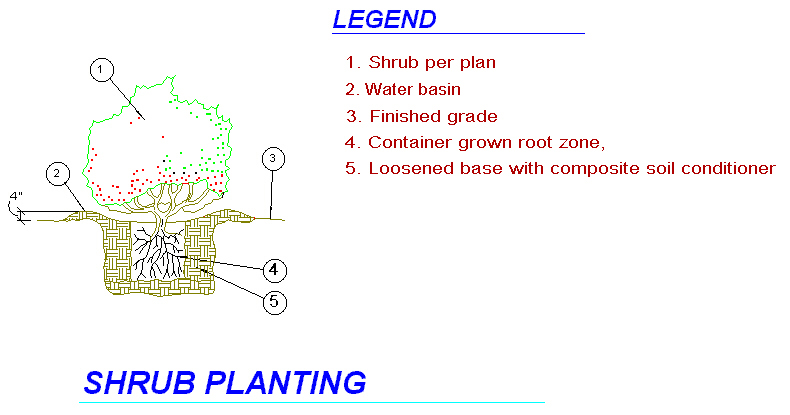
This is a general tilling specification for shallow rooting bedding plants. Area soils and hard pan can prevent tilling deeper than 6". Economy dictates a shallow till. Chiseling a site prior to construction can be beneficial but expensive. Planting of Trees and Shrubs requires either hand or machine loosening of the soil local and specific to the area of the plant as shown. The purpose of the top dressing is to capture and hold moisture, and to shade and cool the soil.
Initial establishment of the root system is the tough part. Getting a loose base with fiber and bacteria tilled in is essential. Breaking up clods so as to eliminate air pockets around the root zone of newly planted Trees and Shrubs, is beneficial. The term Friable, used often, means homogenous and consistently loose soil. This is best achieved by machine where possible. The Second Element - Chemistry The second element to consider is the proper chemistry to follow soon after planting. Soil analysis of a site will almost always reveal little to no Nitrogen and Phosphorus, while surprisingly we see sufficient potassium in most locations around the valley. The pH shows to be neutral to alkaline which for most plants is undesirable. It is recommended to do a soil test to determine a starting point. Improper chemical adjustments can deter a good startup growth cycle. Too much nitrogen can be as bad as not enough. Acidification is beneficial but expensive. Talking to many different Nurserymen will get you many different answers. The one provided here is one gauged on requirement versus economy. Apply the following as a general application, if a soil test cannot be done.
* The quantities above indicate the mixture prepared for application, not the actual rate of application. The rate is determined in 1000's of square feet. An example would be ... apply a 12-24-12 fertilizer @ 7 pounds/1000 sqft. and apply a 5% sulfur solution @ 10 gallons/1000 sqft. Root stimulator is always a plus for the new landscape but expensive. Use it selectively for a quick establishment of select items. An example would be to boost key accents or features in your landscape. The Third Element - water The establishment period, 30 days following the installation, is a critical time for the new Landscape. In the Valley landscape installation occurs year round. Water requirements in the winter and summer are considerably different. Different types of soils drain differently. The terrain such as slopes or valleys effect water retention. Of course the design of the irrigation system can be critical to the proper hydration of the landscape, however the first 30 days is when the program of the controller is fine tuned to get proper precipitation. The owner of the facility or the landscape maintenance manager must be directly involved. The adjustments can be complicated, and if not properly done or ignored, a costly landscape can be ruined, and an extremely high water bill will be a sad surprise! Initially the moisture level of a construction site upon installation is poor, or extremely dry. Unless in a rainy period, the general moisture level must be elevated. This can require multiple waterings per day for a period of one to two weeks. If the soil is very sandy the water leaches away quickly. Container grown plants that are lush and full have a high evapotransporation rate. They have come from a nursery where they were watered and fed constantly. They can go into shock if not watered heavily until the general moisture level in the deep soil region begins to stabilize. Do not misunderstand, too much water can drown plants quickly. Plants require good moisture as well as drainage. Once the roots begin to spread and establish, and the moisture level begins to stabilize, the plants are much less delicate. At this point the quantity of water can be reduced. As the roots go deeper into the soil, we begin to wean them to lower moisture levels. We call this hardening off the installation. During the first 30 days you must monitor separate areas for moisture level. In areas where the moisture is too high, adjustments must be made by tweaking down the heads, or bubblers, or drippers. If the moisture is too low you must tweak up the adjustments, or in some cases add heads, or bubblers, or drippers. The run time of the sections must be adjusted as well as the number of start times. Your irrigation installer in general cannot be there everyday to observe and correct the adjustments. Unless you contract him to do so. Your education or your maintenance departments education is essential for economy. As an example ... A mid summer installation requires watering 2 to 3 times a day for the first week to ten days. Often this is to get the grass rooted, however the bedding plants only require 1 to 2 waterings. Whether it is one or two waterings or 2 to 3 waterings needs to be determined by an on site maintenance supervisor. After the first week to ten days we drop back to a nightly watering with an increased run time for another week to ten days. by the third to fourth week we begin to reduce the time, and finally at one month we may begin to delete days off the schedule. Again this is determined by the look and health of the plants. True establishment takes 6 months to a year and if properly weaned off water and mulched for hydration protection, a good landscape can be deep watered only twice a week and look great. Deep watering is accomplished with multiple start times and soak periods between the run times. As an example ... A mid winter installation where the rainfall has been minimal, the watering maybe less by 50%. The Evapotransporation of the plants is low and water requirements are less, however the deep soil moisture level must still be raised. Rainfall in the Valley can be much less in the winter than the summer, and drier conditions may be prevailing. Even though the daytime temperature is less than 70 the plants can still go into shock because of lack of water in soil that is low in it's moisture level. Don't take a chance, run the watering twice a day for three or four days checking everyday to look for pooling or puddles. If puddles form and refuse to drain, back off the water until they disappear. Determining whether the plants are getting too much water or not enough is not difficult. Plants the are not getting enough water wilt quickly. Their heads or tops curve down and their leaves close or wrinkle. Eventually if not rectified the leaves will dry and drop off. A plant that is drowning will often look normal for a few days and then quickly begin to drop it's lower leaves. The ground around the drowning plant will be littered with still green leaves. Some yellowing of the lower leaves will occur earlier on before the dropping begins, so be on the lookout. After the first 30 days of intensive watering much of the fertilizer that the landscape installer used is washed away. It is a good idea to fertilize again using a high phosphorus fertilizer. Pay attention to the season and don't use to much nitrogen, 5 to 8% is enough. Using 30 to 40% phosphorus will make for strong roots and lots of color on flowering plants. Add some more sulfur to aid in breaking down the mineral salts in the water, and harden off the installation. Watch for pests and diseases and contact your Nurseryman if you have a problem. Each remedy is different and we don't like to spray chemicals unless necessary. Drawings and prints - helpful add in... Here is a general landscape specification for you to use. Add it to you prints Specifications:
Courtesy - Earth Irrigation & Landscaping Ltd.
|
|
Copyright© Earth Irrigation & Landscaping Ltd. Site Designed and Maintained by PERi LTD |
 Detailed Landscaping Specifications ... Pack'em up and Take 'em with you.